 By Ethan Brooks
Updated November 2026
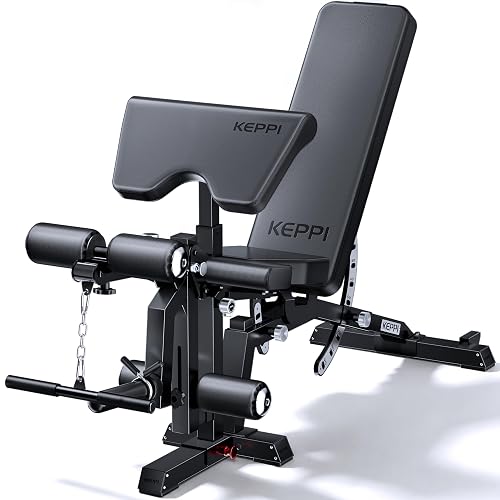
A fid adjustable weight bench is a bench that changes angle between flat, incline and decline positions, usually with a simple pin or lever system, and it is built around the idea of an adjustable frame that can handle different lifts at home. In this guide you will learn what the “FID” design means in practice, how to check whether a bench fits your space and body, how to set it up safely, and how to avoid the mistakes that cause most wobbly or uncomfortable home setups.
What “FID” Usually Means on a Weight Bench
“FID” is most often used in the fitness equipment trade as shorthand for a bench designed to adjust through a Flat, Incline and Decline range. Not every manufacturer uses the term the same way, so treat it as a description of the adjustment range rather than a guarantee of any specific feature. When you shop, check the product listing for the actual angle settings and the number of positions rather than relying on the label alone.
Shopping for one? See our guide: 6 Best Rogue Adjustable Weight Bench Options for Home Gyms (2026).
Most FID-style benches share a few traits. They have a seat pad and a back pad that can be raised or lowered, a base frame that stays put during use, and a locking mechanism at each adjustment point. Some add a leg developer or preacher pad, but those are accessories rather than requirements.
Step 1: Measure Your Space Before You Buy
Most people underestimate how much room a bench needs. A flat bench might only take up a rectangle about 4 feet long and 2 feet wide, but once you add the clearance you need to get on and off safely, the footprint grows quickly. Plan for at least 3 feet of clear space on each side and about 6 feet of length if you plan to lie down fully and extend your arms overhead.
Measure the following before you narrow your choices:
- Ceiling height, if you plan to press overhead from a seated position
- Floor length and width in the spot you intend to use
- Distance from the bench to any wall, rack, or storage you will reach past
- Whether the floor is concrete, wood, or carpet, since carpet can cause the frame to rock
Step 2: Check the Adjustment Range and Locking System
The main reason to buy an adjustable bench is the angle range, so compare the settings closely. A bench that offers a flat position plus a few incline angles covers most upper-body work. If you want to do decline presses or certain core exercises, confirm that the decline setting is actually listed.
Look at how the seat and back lock
Pin-and-hole systems are common and generally reliable when the pins are thick and the holes are cleanly cut. Ratchet or lever systems allow faster changes but should feel secure under load. Before you buy, read owner feedback about whether the locks slip, and inspect product photos for visible welds and reinforcement at the adjustment points.
Confirm the weight capacity
Manufacturers specify a maximum user weight and sometimes a separate limit for the bench under a loaded barbell. Use the manufacturer’s figure, and leave a comfortable margin above your planned loads. Remember that the stated capacity assumes correct setup and use.
Step 3: Set Up the Bench on a Stable Surface
Once the bench arrives, assembly is usually a matter of attaching the frame, the pads and the adjustment hardware with bolts or pins. Follow the manufacturer’s order of steps and tighten every fastener firmly. After assembly, run through this quick check:
- Place the bench on a flat, level surface and press down on each corner to confirm it does not rock.
- Cycle through every adjustment position and confirm each lock engages fully.
- Pull on the pad from the side and from the front to check for play.
- Retighten all bolts after the first few uses, since parts can settle.
If the bench rocks on a hard floor, the frame may be warped or a foot may be uneven. Do not load it until the problem is fixed. A small rubber mat under the feet can help on slick concrete, and a larger mat helps protect floors and reduce noise from dropped weights.
Step 4: Use the Bench Safely
Safety on a home bench comes down to a few habits. Lift the bar from the rack with a controlled setup, keep your feet planted, and keep your grip width consistent. When switching between incline and flat, set the pad before you load the bar, not while holding weight.
Positioning for different lifts
- Flat press: Keep your eyes under the bar, shoulder blades pulled back, and feet flat.
- Incline press: Set a moderate angle, often in the range many trainers describe as 15 to 30 degrees, to target the upper chest and front shoulders.
- Dumbbell rows and single-arm work: Use the bench as a support, keeping the non-working hand and knee stable.
If you are returning from injury, have heart or joint conditions, or are unsure about heavy loading, consult a doctor or certified trainer before using a new bench for high-load lifts.
Buying Checklist for a Fid Adjustable Weight Bench
Use this list to compare options side by side:
- Confirmed flat, incline and decline positions
- Listed user and load capacity
- Locking system type and reviewer notes on reliability
- Pad thickness and upholstery quality
- Footprint that fits your measured space
- Whether a leg developer or preacher attachment is included or sold separately
- Return policy and warranty length as stated by the seller
Comparing Bench Features at a Glance
The table below summarizes the features that matter most when you compare an adjustable bench with a simpler flat model.
| Feature | Why It Matters | What to Look For |
|---|---|---|
| Adjustment range | Determines which lifts you can do | Flat, incline and decline settings |
| Locking system | Affects safety and speed of changes | Thick pins or secure ratchets |
| Frame stability | Controls how safely you can press heavy | Wide base, welded joints, no rocking |
| Pad quality | Comfort and durability | Firm foam, durable covering |
| Footprint | Must fit your room | Measured against your clearance |
Common Mistakes
- Buying by angle count alone. A bench with many positions but a flimsy base will feel worse than one with fewer settings and a solid frame.
- Ignoring floor clearance. Forgetting to measure side clearance leads to a cramped, unsafe setup.
- Changing the angle under load. Adjust the pad before you rack the bar.
- Skipping the post-assembly check. Loose bolts are the most common cause of noise and wobble.
- Placing the bench on carpet without a base mat. Carpet can let the feet sink unevenly.
- Assuming capacity means safe for maximal lifts. Leave a margin and use spotters or safety arms for heavy pressing.
Recommended gear
A few accessories make a home setup more stable and comfortable. Consider the following categories, which you can search directly on Amazon.
- Rubber gym flooring tiles: These protect the floor and reduce bench movement on hard surfaces. View on Amazon
- Olympic barbell collars: Secure plates so they do not slide during presses. View on Amazon
- Heavy-duty bench pad replacement: Useful if the original cushion wears down over time. View on Amazon
- Lifting straps or wrist wraps: Help with grip and wrist support during heavier pulling and pressing. View on Amazon
Related Reading
If you are still deciding between models, compare features in Rep Ab 4100 Adjustable Weight Bench: Setup, Features and Buying Tips and Titan Fitness Weight Bench Review: Features and Performance. For a broader list, see 5 Best Adjustable Incline Weight Bench Picks for Home Gyms (2026), and if you are working with a tight space, Portable Weight Lifting Bench: 7 Best Picks for Small Spaces (2026) may suit you better. Buyers looking at used equipment should read Weight Lifting Bench Used: How to Buy a Secondhand Bench Safely before purchasing.
FAQ
What does FID stand for on a weight bench?
It is generally used to describe a bench that adjusts through flat, incline and decline positions. Check each product’s listed angle settings, since terminology varies between brands.
How much space do I need for an adjustable bench?
Plan for a footprint of roughly 4 by 2 feet for the bench itself, plus about 3 feet of clearance on each side for getting on and off safely. A longer area helps if you plan to extend fully on flat presses.
Can I use an adjustable bench with a barbell?
Many adjustable benches are designed for use with a barbell, but you should confirm the manufacturer’s guidance on barbell loading and check whether a rack or safety arms are required for your lifts.
Do I need a rack for heavy pressing?
For heavy pressing without a spotter, safety arms or a rack are strongly recommended. Consult a certified trainer if you are new to heavy loading.
How often should I check the bolts and locks?
Check them after the first few uses, then at regular intervals, such as monthly. Loose hardware is one of the most common issues with home benches.
Can I put an adjustable bench on carpet?
You can, but a rubber base mat or a flat, rigid platform is recommended to keep the frame level and prevent rocking.
Is an adjustable bench worth it compared with a flat bench?
If you want incline and decline work, yes. If you only plan flat pressing and simple dumbbell exercises, a flat bench may cover your needs with less complexity.
Conclusion
A well-chosen fid adjustable weight bench gives you flat, incline and decline work in a footprint that fits many home gyms. Measure your space, confirm the adjustment range and locking system, and run a full check after assembly. With a stable setup and safe habits, the bench can support years of consistent training.
Ready to choose one?
About Ethan Brooks
Ethan Brooks is part of our editorial team and reviews and edits our budget home gym equipment guides, checking product details against manufacturer specifications and owner feedback.